
Overview
The Microsoft (MS) Loop app is a productivity tool that uses a powerful and flexible canvas (workspaces) that includes portable components that sync across applications.
Loop assists teams to think, plan and design together in collaborative shared workspaces that can be updated in real-time and will stay up-to-date no matter where the document is accessed. For example, if a table is inserted in a Teams chat, OneNote, or Outlook, and this table is updated in any of theses apps, this update syncs immediately so you have the updated information instantly.
MS Loop integrates and syncs with many Microsoft apps such as: Microsoft Planner, Outlook, OneNote, Teams, and Whiteboard and is also available on mobile devices, but has some limited functionality.
Loop can be used for:
- Collaborate on Documents
- Brainstorm ideas
- Project planning/Task management
- Research and gather feedback
- Communicate on visualizations
- Collective Note taking
- Training and Onboarding
- Event Planning
NOTE: There are many videos and links to learn more about MS Loop to review before getting started found under the References/Links area toward the end of this article.
Loop workspaces are virtual spaces that can be shared by co-workers and those outside of RPI.
Microsoft Loop has 4 main elements/building blocks:
- Loop Workspaces - Virtual hubs used to organize and collaborate on projects with your Team. Contains loop pages, components, files and documents that team members update simultaneously. Workspaces can include loop pages that include (Word docs/spreadsheets/links to websites)
- Loop Pages - Where multiple components can be added separately on one page.
- Loop Applications - Microsoft Planner, Outlook, OneNote, Teams, and Whiteboard.
- Loop Components - Tables, Text, as well as bulleted, check, numbered and Task lists.
[Workspace gallery showing seven named workspaces]
Procedures
IMPORTANT First Step! Before creating a workspace you will need to "Submit a request" to have Help Desk create your group members (list of RCS user IDs and name) of who will have access to the Loop Workspace and the name of the Group. NOTE: This could take up to an hour before you have access.
Logging into Microsoft Loop
- Go to https://loop.cloud.microsoft
- Login with your RPI email and RCS password.
 Microsoft Loop made easy!
NOTE: There are many features of MS Loop that may not be covered below, so it is best to review the References area at the end of this article.
✔Create a workspace
✔Add a Page
✔Add text or Loop components to a page
✔Share a page or workspace for collaboration
Workspaces
Once you log in, you will see a start page with any workspaces you have access to. Workspaces organize a team or a project.
Workspace limits:
- Size limit - Each Loop workspace has a max size of 5 GB. (includes storing files and other content)
- Member limit - Each Look workspace can have up to 50 members
To open a workspace:
- Click once on a workspace.
- Click the ellipsis
located in the upper right of a workspace icon to: Open/Mark as a Favorite/Rename/view members or delete a workspace.
Create a Workspace
- Click the + Create new button from the top left of the Loop screen.
- Choose New workspace.
- Hover over the top area of the new workspace and click on Update cover to change the image.
- Select a stock image from the list, and then click the Update button in the lower right corner.
- Under the Name field type the name of your workspace.
- Under the Share your space field, begin typing the group name or individual names on who will collaborate on this workspace. NOTE: you can add extra members to the group at a later time as well.
- Click the Continue button.
- Under the Add files to your workspace, type a description on how this workspace will be used and click once on each document you would like to insert into this workspace for the group to see. NOTE: Documents can be added at a later time as well.
- Click the Create button.
The new workspace is opened on the screen showing an Untitled page.
Default Templates
Templates are a great way to assist when deciding what information a workspace should include. When a workspace opens, an Untitled page appears showing built in templates at the bottom of the page that can be used when creating a new page in your workspace.
There are 24 default templates that you can use:
- Click Template Gallery to view all the templates. Some templates below.
-
- Project Brief, Team Decision, Project Planning, Meeting Notes, Stand-Up Meeting, Issue Tracker, Problem Framing, 1:1 Meeting, Tech Spec, Product Spec, Media List, Marketing Plan, etc.
At the bottom of every new page are most used template to choose from.
[Templates in the Template Gallery]
2. Click each template on the left to review what the template includes.
3. Click the Use template button in the lower right corner of the Gallery to open that template.
The template appears in the page area.
4. Complete the information on the page. NOTE: Pages are automatically saved.
Adding and Formatting text
Once you create a new page, just start typing the text.
To view general options like Table, Checklist, Bulleted list, Numbered list, Date, etc.:
- Click the "+" plus sign to the left of the text and the general menu options opens.
[General options menu options]
2. Choose an option.
Using Bold, Italic, Underline, and headings
- Select the text and the formatting toolbar appears.
[options on the formatting toolbar]
2. Click the ellipses to see more options.
[Selections on the more options formatting toolbar]
3. Choose an option.
Shortcuts on a Loop page
- Move your cursor on the page and then choose:
-
- Type "/" to explore content types you can insert. Opens a menu of options below to choose from.
-
- Type "@" to mention people or link a file. After the "@" type the persons name and then choose the person from the list below.
-
- Type ":" to open a list of emojis to select.
Loop Pages
Once a workspace is created it is time to add some Loop pages. Pages use text and Loop components to organize the workspace. These pages can include a document, a weblink or a blank page.
[Create new button showing selections Page, Link, Upload a file and New workspace]
Adding a Page
- While on a loop page, click the + Create new button located in the upper left of the loop page screen.
- Choose Page.
An Untitled page appears on the screen and shows in the middle navigation bar.
Share Page button
- With the page open, click the Share button from the upper right corner of the page.
[Share button options like Copy as Loop component, Share, copy as a link, Send invite and Manage page sharing]
2. Choose Share and the share dialog box appears with an area to add name/email of recipients and a message. A page link can be copied by clicking the Copy as link button. Click link settings to make changes to the shared link.
Share page link
- Click ellipses ". . . " to the right of a page and choose Share page link
[More page options with Share page link highlighted]
The Link copied dialog box appears stating that the link was copied. This link can now be pasted to an email.
New subpage
- Click ellipses ". . . " to the right of a page and then choose New subpage.
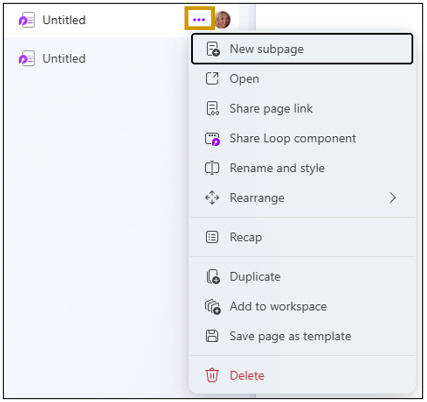
[Page More options selections highlighting New subpage]
A new subpage appears under the page.
Adding a Link
- While on a loop page, click the + Create new button located in the upper left of the loop page screen.
- Choose Link.
- Begin typing the URL full Address - https://rpi.edu and the Text to display may change for that URL.
[Add a link dialog box to add Text to display and URL Address]
4. Click the Add button and the link is added to the middle navigation area. Just click the link to open the website.
Upload a file
- While on a loop page, click the + Create new button located in the upper left of the loop page screen.
- Choose Upload a file.
- Select a file from the File Explorer and then click Open.
The file is added to the middle navigation area. Just click the file name and the file opens.
Recycle bin
If you happen to accidentally delete a page or link from your workspace, check the recycle bin found at the bottom of the middle section of the loop workspace to restore deleted pages and components.
[Recycle bin highlighted at the bottom of the middle section of a workspace]
Loop components
Using Loop components in: OneNote/Outlook/Word and Whiteboard
Microsoft Outlook - You can enhance your email messages by inserting Loop components. If the recipient has a Microsoft account, they can interact with the component directly from the email. Look for the Loop icon to access a list of available components.
[Microsoft Outlook Message ribbon with the Loop Components icon highlighted]
Microsoft Teams - While in a chat session, click the Loop icon at the bottom of the screen to insert a Loop component. Loop pages and workspaces can be shared within team channels.
To add Loop while in Teams, click the " . . ." from the left side bar and search for Loop and then click on the Loop app.
[Teams selected from the Teams left side bar highlighting the Loop icon]
Sharing loop components
- Click ellipses ". . . " to the right of a page and choose Share Loop component.
[Link copied dialog box showing the loop component was copied as a link]
2. Click Settings.
[Link settings options dialog box]
3. Update the settings and then click Apply.
References/Links
Microsoft Loop Explained: this will change how you work
Microsoft Loop - YouTube Videos
New Microsoft Loop app is built for modern co-creation
Keyboard shortcuts for Microsoft Loop
Percipio Videos:
Creating a workspace in Microsoft Loop
Using workspaces in Microsoft Loop
Adding and editing pages in Microsoft Loop
Working with pages in Microsoft Loop
Managing pages in Microsoft Loop
Sharing and collaborating in Microsoft Loop
Creating collaborative content using Copilot for Microsoft Loop
Creating Loop components in Teams 2024
Comments
0 comments
Article is closed for comments.