
Overview
Applications Manager 8.0
UC4 is a web-based application which lets you schedule and submit jobs as well as view and print output.
Procedures
Logging into UC4 (Production database, APXPRD):
- Using Internet Explorer, go to https://mcscitrix.win.rpi.edu/Citrix/MCSAppsWeb/
- Enter your RCS userid and password
- Click on Automic PROD
- Enter your Automic userid and password
Note: To login to the TEST or CLONE databases for Automic:
- Using Internet Explorer, go to https://iacscitrix.win.rpi.edu/Citrix/IACSApplicationsWeb/
- Enter your RCS userid and password
- Click on Testing Applications in the top margin
- Click on Automic DEV or Automic CLONE, as appropriate
- Click on ‘Start the Applications Manager Client’

[Atomic screen showing two links, Start the Applications Manager Client and Start the AppMaster Client]
- Login to Automic:
- Enter your Automic userid, and password.
- Note: your Automic password is case sensitive

[Atomic logon window showing blank username and password line]
Explorer Window - Upon logging in, the first window that appears is the Explorer window. From the Explorer window the user can choose to view information regarding UC4 running (Agents), jobs waiting to run, are running, or have already run in UC4

[Applications Manager window showing the explorer icon, backlog window, history window, status bar, column headings]
History Window: Located in the lower section of the Explorer window, the History section lists the user’s jobs that have run (either successfully or unsuccessfully).

[Applications manager window with a circle around History 197 and a list of the history queue below]
To Query Jobs in History:

[Applications Manager window with a circle around Filter and History Query and Filter Backlog & History features]
History Query Window

[History Query window explaining query criteria information can be saved and these filters can be accessed later from the filter drop-down box. Also by clicking on the icons on the right side of the window will show available modules, chains, applications, agents, queues, requestors and statuses. A % sign can be used as wildcard in criteria fields]
Requests Window:
This window allows the user to select a job/process to run in UC4.
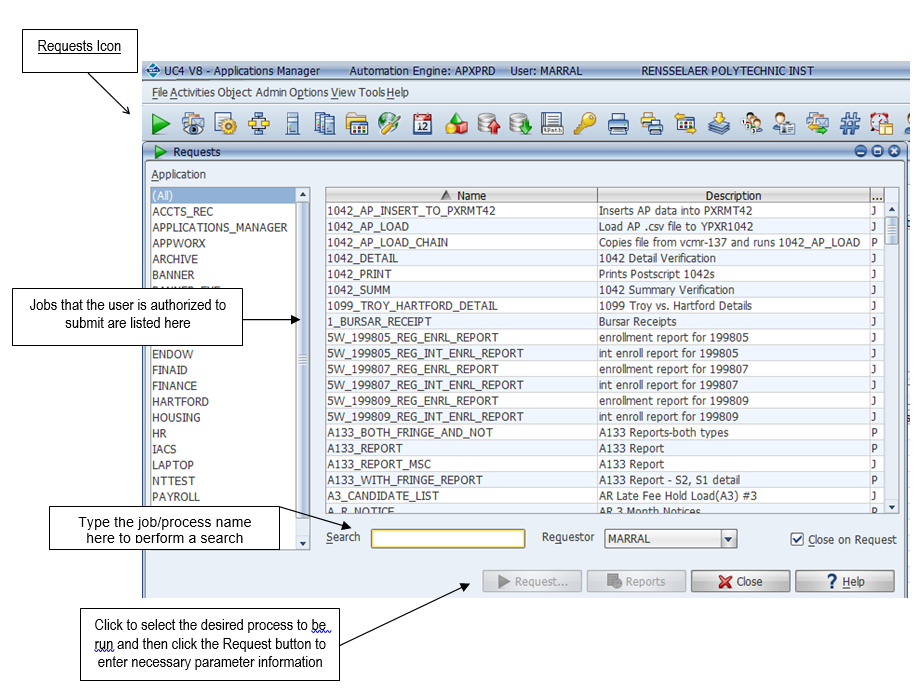
[Application Manager window showing the request icon located in the upper left of the window, jobs that a user authorized to submit, search bar to type a job/process located at the bottom of the window and the process buttons at the bottom right side of window]

[Application Manager window showing the name of job/report on the tab at the top right, description of the send to, send option and output functions. Along with showing submit/start date, choosing a queue, and submit & close, submit, close and help buttons located in the lower right of the window]
Output Functions Available:
- Store: The output for these jobs/processes with this function is stored in UC4 more efficiently and is available for viewing in the Output window using the query function. A majority of jobs/processes have a status of ‘Store’.
- Print: The output for these jobs/processes with this function is printed to a designated printer as identified in the Printer field on the Request window. Output for these jobs/processes can be viewed in the Output window using the query function.
- Log: Output files with this status will be limited to those jobs/processes that require user intervention for special circumstances like special paper or printer availability. ‘Log’ is the default status for output files appearing in the Output window.
Output Window: This window displays output from jobs submitted with a status of ‘log’ by the user. The default status setting for the Output window is ‘log’. Click on the Query button and select the search criteria to view jobs/processes with ‘print’ or ‘store’ status. Once output is displayed, the user can choose to view and/or print the associated job output.

[Automic window showing status definitions, and a blank output query window describing query criteria information, custom filters, based on permission levels certain icon will be available, using % as a wild card and the sort radio button]
- Choose your selection criteria and click OK for output entries to appear in the Output window.
File Associations:
Note – W:\\iacsdept.win.rpi.edu\banner$ needs to be mapped as one of your network drives for the file associations in UC4 to be available for viewing output.
This window contains information relating to output files and their possible viewing applications (MSExcel, MSWord, Notepad, Adobe Acrobat, etc). When the user requests output to be viewed, UC4 will allow the user to choose which application (MSExcel, MSWord, Notepad, etc) to use as the viewer.

[Automic window contains information relating to output files and their possible viewing applications (MSExcel, MSWord, Notepad, Adobe Acrobat, etc). When the user requests output to be viewed, UC4 will allow the user to choose which application (MSExcel, MSWord, Notepad, etc) to use as the viewer.]
Viewing Output – select the output file you wish to view.

[Automic window showing the selected output file for viewing and the View button in the lower right corner]
After clicking on the View button, the user will choose from the available file associations, the appropriate viewer for viewing the job’s output.

[Automic window showing a list of dirsired viewer files]
Output viewed using Wordpad.

[Window showing the selected output file in Wordpad]
Settings Window: This window allows the user to set their AUTOMIC session settings. This window is accessed from the drop down under Options.

[Automic window showing the Settings Window,]
The General tab contains settings for:
- Explorer Refresh Seconds – AUTOMIC refreshes the Backlog, History Agent Summary and Queue Summary at the number of seconds set here.
- History Display Limits – Enter the Previous Minutes amounts for display in the Job History window.
The Toolbar tab contains settings for what icons to be displayed up on the toolbar

[Automic window showing the Toolbar tab, with icons]
Changing Column Headers in AUTOMIC Windows
In many of the AUTOMIC windows, you can choose the columns you want displayed. You can also change the order of the columns and change the column names.

[Automic window showing the Column Heading with a circle around it]
The tables that you can customize are listed below:
|
Menu Option |
Customizes |
|
Backlog |
All views of the Backlog viewable from the Explorer window. |
|
History |
History on the Explorer window. |
|
Output |
The Output window. |
|
Agent Summary |
The Agent Summary on the Explorer window. |
|
Queue Summary |
The Queue Summary on the Explorer window. |
|
Process Flow Summary |
The Process Flow Summary on the Explorer window. |
|
Status Summary |
The Status Summary on the Explorer window. |
|
Task Output files |
The Output files tab on the Task Details window. |
|
Agent Logs |
The Agent Logs window. |
|
Gantt task summary |
The information displayed in the pop-up table when you hover over a task or process flow in the Backlog Gantt view window and the Flow Diagram window. |
|
Backlog task summary |
The information displayed in the pop-up table when you hover over a task or process flow in the Backlog. |
The steps for choosing columns and changing the column order are the same for all tables. To edit a table, open the Options menu, select Tables, then select the table you want to edit. The edit window for the History table is shown above.
The top of the window shows the table as it will be displayed in AUTOMIC. The bottom of the window displays a list of the columns that can be displayed.
Making Changes
The table below describes how to customize AUTOMIC tables.
|
To: |
Do this: |
|
Display a column |
Check the VISIBLE column. All visible columns are brought to the top of the list. Newly checked columns are added to the far right side of the table. You can click the title of the column in the top display and drag it to a new location. |
|
Change the name of a column |
Edit the entry in the Name column. |
|
Control the width of a column |
Enter a number of pixels in the MAX_WIDTH and MIN_WIDTH columns. If you enter MIN_WIDTH settings, it’s possible that some columns will be pushed off the table. If this happens, you will want to select the Horizontal scrolling option described below. |
|
Format date columns |
Select a date format from the FORMAT column. |
|
Control the margins within a column |
In the Column margin field, enter a number of pixels to be added to the left and right margins of the column. |
|
Allow scrolling |
By default, tables do not scroll. As you add columns, AUTOMIC adjusts the width of the columns so they are all displayed in the table. If the tables become to narrow to read the contents, you can select the Horizontal scrolling option. This maintains the default width of the columns and displays a scroll bar across the bottom of the table. |
|
Change the order of the columns |
Select the title of a column in the top window and drag it to a new location. |
|
Return the table to its last saved setting |
Click the Reset button at the bottom of the window. |
Password, Remote Connection, AUTOMIC Help Information
To change your AUTOMIC password:

[Automic window showing the password changer screen which is blank. It shows Current, New and Re-enter fields]
Remote Connection Information:
To access AUTOMIC remotely (from home), you will need to have the VPN (Virtual Personal Network) installed on your home/remote PC. Additional benefits of having the VPN installed on your remote PC are to access to MSOutlook- with your personal folders, filters, etc. as well as access to your network drives
For VPN installation instructions, go to https://itssc.rpi.edu/hc/en-us/articles/360008783172-VPN-Connection-and-Installation
Comments
0 comments
Article is closed for comments.